
Maximizing Mobile Augmented Reality
You can’t stop progress.
Mobile Augmented Reality (MAR) should be flooding the consumer landscape within the next 6 months – whether you like it or not. I know a decent amount of the design and development community considers augmented reality in ANY form a gimmick but I fear they’ve forgotten what its like to say “wow”. Don’t get me wrong – it’s difficult to remain innocent when you know how all the special effects work but if you neglect the innocence of our audience then you will inevitably be left behind.
That said I’d like to offer a short list of what I’ve discovered while working with MAR as well as a few tips and possible technical vocabulary for a few techniques I’ve come up with.
Integration
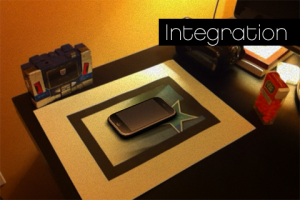 I’ve come to notice that there’s basically 2 genres of augmented reality: accurate and integrated. Accurate augmented reality is nothing more than the composition of 3D objects over live footage while correctly manipulating these objects to make them match the natural dimensional space they occupy while minimizing slip. Integrated augmented reality takes the core functionality of accurate augmented reality but strives to mimic light, reflection, shadow and other properties of real-world objects to achieve near perfect integrations of 3D objects.
When using String with Unity use one Directional Light in your scene that you can make a reference to and leverage String’s color value that is returned from StringWrapper (which can also easily be manually calculated with Qualcomm’s QCAR as well) to easily tint your scene to match the lighting in the real world. Also, take the brightness of this single light way down – I find .15 to .2 works very well for matching interior lighting. If you are ballsy enough to use a custom shader that has color properties associated with your specular highlights be sure to adjust those colors with StringWrapper’s color value too and a normal map might just be worth the performance hit once you see how amazing they make everything look.
Nothing in the real world is perfect, which is exactly why augmented reality always looks fake. A great technique for helping to composite an augmented reality scene is to create a noise layer (GUITexture in Unity) to add some additional imperfection to everything – the effect really helps sandwich everything together. Here’s a download to 3 noise overlays one for 480×320, one for 960×640 and one for 1024×768 iOS resolutions that I use quite often which were quickly thrown together in Photoshop. Make sure you change the “Texture Type” to GUI to ensure they appear as clean as possible. Just add the following script to a GUITexture and drag a reference to each of the noise images into the inspector(C#):
using UnityEngine;
using System.Collections;

public class Noise : MonoBehaviour{

	public Texture2D iphone, retina, ipad;
	float opacity = .025f; //Tweak this value to your desired amount of noise visible on screen

	void Start (){
		switch (Screen.width) {

		//iPad
		case 1024:
		case 768:
			guiTexture.texture = ipad;
			break;

		//iPhone Retina
		case 960:
		case 640:
			guiTexture.texture = retina;
			break;

		//iPhone
		default:
			guiTexture.texture = iphone;
			break;
		}

		guiTexture.color = new Color(.5f,.5f,.5f,opacity);
		guiTexture.pixelInset = new Rect(0,0,Screen.width, Screen.height);
	}
}
Or if you prefer here’s a prefab (right click and choose “Save Link As…”) you can just drop into your scene that will set everything up and allows you to tweak the amount of noise added. UPDATE: My new String Manager uses procedurally created noise textures which will save precious resources.
Mobile cameras automagically adjust exposure, brightness and other properties – this basically means the color black simply doesn’t exist when it comes to the image they capture. Keep this in mind when you are creating objects that “should” be black. Pulling black textures closer to grey will help them match the levels that mobile cameras come up with.
Always, always, always add a transparent textured shadow to objects! Nothing ramps up realism like a shadow – that extra draw call as a result of needing 2 materials – a transparent one and the actual texture – is worth it 100% of the time. Always.
Offset Spawning
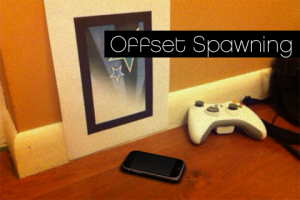 Just because current MAR requires a marker doesn’t mean you need to call it home base for everything you do. Consider setting up augmented scenarios that will allow you to get your content closer to real surfaces by offsetting where objects spawn in relation to the tracked marker.
While spawn offsetting does requires some rough measurements and repetitive builds to make sure everything lines up, the effect is nothing short of amazing when it comes together.
Penetration
 Masking geometry that passes through the plane of the marker or any other predetermined surface or structure can easily be obtained with the masking techniques I mentioned in my earlier post on masking in Unity. This technique lends itself strongly to effects and animations where you need to remove or animate in objects in a logical manner that somewhat adheres to reality. If you utilize a hinged marker matching plane you can easily create a portal or door to allow objects to enter through.
Physical Occlusions
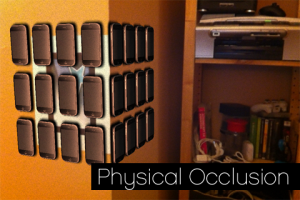 Without a doubt the most impressive effect for making an augmented scene appear believable is having physical objects occlude composited objects. Imagine creating a driving game where a soda bottle can be used as a physical obstruction as well as allowing for the possibility to drive behind it – the possibilities are limitless. You will also need a way to mask geometry as discussed in my earlier post on masking in Unity and this effect runs very fast on an iPhone.
Tunneling
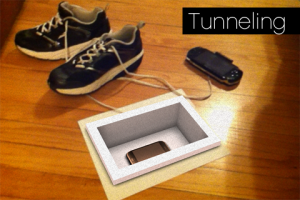 Using the masking techniques I mentioned previously you can easily create masks that can mimic depressions, holes, graves and cutouts to fake surface deformation and embedding. While this effect can be done with a simple masked container to simulate depth in a surface, creating supporting geometry around the disruption will help fade the effect into reality. When done well, this effect boggles the mind when seen in person and lends itself to games like nothing else – putting, zombies, bullet holes, Portal in MAR anyone?
Composition (not demonstrated in video)
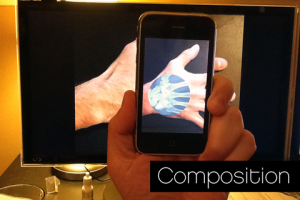 Just because it’s 3D doesn’t mean it has to be 3D. By using textured planes with supporting imagery and precise placement you can subtlety and seamlessly change or composite printed or screen material. Sometimes composition has an even more impressive and shocking result than replicating physical 3D in augmented space and almost feels more real than the best augmented 3D model since you are actually changing what is physically present in the real world. Reveal hidden messages, display further detail or give your users working x-ray vision and they will say “wow” again and again.
Use a NOC (null offset content)
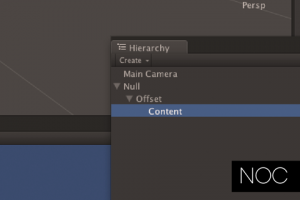 A NOC (pronounced “knock”) is simple organizational structure that maximizes flexibility by setting up a hierarchy for all content that is intended to be augmented. A NOC begins with a null object which contains an offset and a holder for all visual content. With a NOC you would set your base null as the target for all augmented transformations allowing the child offset object free to be utilized for offsetting your content’s rotation, position and scale in relation to the tracked marker. This structure allows for non-AR positioning when a maker is lost, custom setups to handle table-centric and wall-centric markers with the same content, adjustment systems for exhibit-based AR installations and much more.
Correct Application Requirements
When you submit your application for sale ensure you setup any hardware requirements that state that a video camera must be present on the device. If you don’t correctly submit an application with correct minimum hardware specifications you will likely end up with confused users who now own a dead application that crashes on launch. Its imperative you get this right the first time as Apple and others do not allow you to change hardware requirements on an existing application.
Backdoor markers and Breadcrumbs
The worst part of mobile augmented reality is showing new people your work when you weren’t prepared. To prevent yourself from saying: “We did some great augmented reality work but… well… do you know where I can find a printer and show you?” always put an additional marker in each application you do that you are sure to have with you wherever you are – your business card perhaps? This way you’ll never be caught with your pants down.
Marker-less tracking isn’t here yet but we all want more freedom in our augmented canvas – why not drop some breadcrumbs? You can easily connect multiple, measured markers to fall back to a single object – once you’ve found a marker stop looking and find out what that specific marker’s offset is from the “origin” marker – 360 degree room overlays shouldn’t be impossible with this approach.
I don´t understand the part about tunneling. Why you don´t use geometry? how you create the mask for a tunnel?
Thanks for this awesome post!
I’ll try to put a video together soon to demonstrate how tunneling is done. Stay tuned.
Keep em coming man, this is awesome stuff.
Great writeup. It was very interesting to read.
Any chance for us Unity developers to have a package to import of a test scene to get us up and going? I think that would really help out.. thoughts?
thanks for your post!
I’m actually finishing up a sample game that will be given away for free from the developers portal when it is live in the next week or so. 😉
Hey! I tried to apply the integration to my 3D objects, but it only got them moving around very weird, but no integration, do you know why that happens?
I added a prefab download link in the text above – grab it, it might fix things for ya!
it did! thanks!!
Dude, you totally kick asses!
Thank you!