RoomMapper for Quest2 Passthrough
The RoomMapper is a helper/add-on tool for the (currently experimental) Passthrough API for the Oculus Quest 2. I have no doubt and I look forward to Oculus making this solution obsolete with their advancements to public access of Passthrough. Before using it make sure you are familiar with the Passthrough’s prerequisites and required setups covered here: https://developer.oculus.com/experimental/passthrough-api/ and use the most recent version of Oculus Integration (v.34 as I write this).
Here’s an overview video of the included demo explaining the features, user experience, and possibilities of the RoomMapper – to navigate through the running demo, use the right touch controller and its thumbstick will move between each phase:
Download RoomMapper
Get the RoomMapper package for Unity HERE!
Getting Setup and Started
After you have a properly setup Unity project and your device is in “Experimental Mode” you can verify everything is ready by running the official Passthrough scene within Oculus Integration (Oculus/SampleFramework/Usage/Passthrough) on your device. Please note that, as of this post, you can not utilize Passthrough with the Oculus Link and Unity Play Mode for iterative work – you will simply have a black scene to work with until you deploy to device. If the Passthrough scene from Oculus works fine then fire up the demo scene for RoomMapper (Pixelplacement/OculusQuest/Demos/Scenes) on device and give it a try.
Once you have a valid environment:
- – Import the RoomMapper package
- – Create a new scene
- – Delete any existing camera(s)
- – Add the OVRCameraRig and on it set “Tracking Origin Type” to “Floor Level”, under Quest Features > Experimental turn “Experimental Features Enabled”, “Passthrough Capability Enabled”, as well as the “Enable Passthrough” at the bottom of the component to true
- – On the rig’s CenterEyeAnchor set “Clear Flags” to “Solid Color”, and “Background” to black WITH an alpha of 0
- – Make sure the rig has an OVRPassthroughLayer added and that “Placement” on it is set to “Underlay”
- – Drag the RoomMapper prefab (Pixelplacement>OculusQuest/Prefabs) into your scene
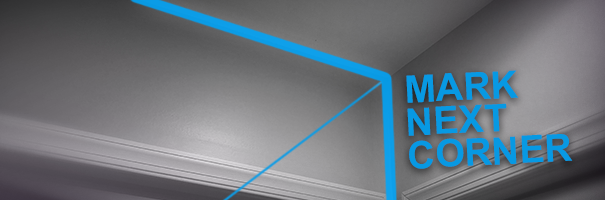
Now that your scene is ready I’ll explain the intended flow of RoomMapper. When working with mixed reality it is typical to consolidate all of your content/experience into a parent GameObject. The reason for this is that mixed reality typically occurs in environments you will know NOTHING about and sometimes your game will be run on a table, or tracked to a cereal box, or in the middle of a living room, or ANYWHRE. This means that mixed reality typically needs a phase where it gets setup, or analyzes a real world location before turning everything on. RoomMapper facilities this paradigm with its “Content to Activate” array. Simply jam what you want to display AFTER the mapping is complete (or verified) and the solution will activate it when things are ready to go. Please note that there is also a “OnRoomMapped” event on the RoomMapper class you can hook onto for use when things are ready as well.
After you have things mapped and turned on we can start making mixed reality!
Helpful/Random Details
Try running and using the RoomMapper in editor with Oculus Link at least once. I know you won’t be able to see your room but run through the steps to at least see what happens when it is done (just map ANYTHING out to test). Once you do take alook in “(RoomAnchor)” and you will find a few “(Walls)”, a “(Ceiling)” and a “(Floor)”.
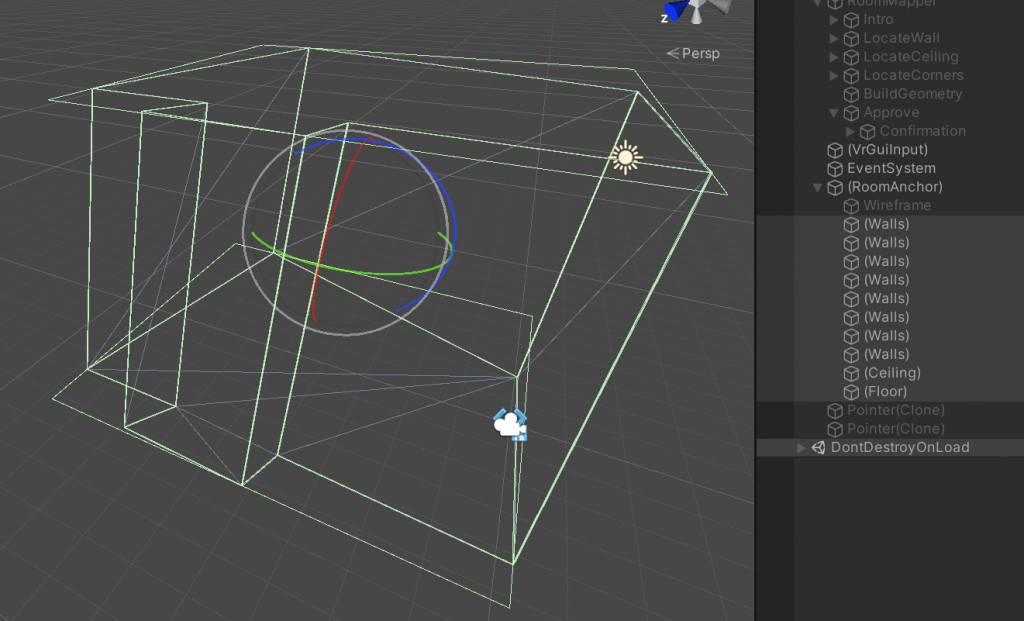
The RoomMapper is a singleton. You can get to the parts of a room shown above through its Walls (an array), Celling, and Floor properties (i.e. RoomMapper.Instance.Ceiling). The GameObjects in the Walls array are sorted largest wall to smallest.
The RoomMapper actually drives a sub state machine since there are so many complex steps in the flow required to set things up. Not important – just letting you know!
The RoomAnchor is a nice helper that sets its Transform up to be centered in the middle of your Guardian with a reliable forward for use in content placement and room directionality.
You can set what materials the RoomMapper applies to each surface in its Inspector. Or leave any blank and it won’t apply anything.
RoomMapper will load the last room mapping you did. Approve it or redo it; your choice! If the Quest’s tracking shifted or was lost, or your changed your Guardian, the mapping may not align as nicely as it did before.
This solution includes my Surge framework which you might find useful for creating things easily in Unity.
Please share any bugs or issues in the comments here or feel free to email me through the contact form on my site here.
Thanks Bob, for providing this excellent doorway into Mixed Reality. Your work is beautiful.
[…] Bob Berkebile just released RoomMapper for free and Unity developers can use it with Oculus Quest 2 as a $299 standalone AR and VR […]
[…] Bob Berkebile recién publicado RoomMapper gratis y los desarrolladores de Unity pueden usarlo con Oculus Quest 2 como un kit de desarrollo de […]
This has incredible potential! Have you thought about using pattern recognition in order to include interactive objects? Would it be possible to track real objects like chairs or peripherals like keyboards and mice using QR style codes?
Thanks! The Passthrough on Quest2 does not currently give you access to the video feed so you can not do anything with it yet.
[…] Bob Berkebile just released RoomMapper for free and Unity developers can use it with Oculus Quest 2 as a $299 standalone AR and VR […]